

How To Install Private Cloud
Chapter v Powering On Oracle Individual Cloud Apparatus
Table of Contents
- 5.i Ability On Task Map
- five.2 Before Initial Power On
- v.iii Power On for the Outset Fourth dimension
- 5.3.1 Review Safety Guidelines
- v.3.2 Inspect the Apparatus
- 5.3.3 Connect the Power Cords
- 5.3.iv Power On the Appliance
- 5.3.v Connect the Appliance to the Network
- five.iv What's Next?
This chapter explains how to power on the Oracle Individual Deject Appliance for the start time at your site.
Alert
Before starting the system and applying the initial configuration, read and empathise the Oracle Individual Cloud Appliance Release Notes. The section Known Limitations and Workarounds provides information that is critical for correctly executing the procedures in this document. Ignoring the release notes may crusade yous to configure the system incorrectly. Bringing the arrangement back to normal performance may require a consummate factory reset.
5.1 Power On Task Map
Table 5.1 describes the steps for powering on the Oracle Private Cloud Appliance at your site.
5.2 Before Initial Power On
Earlier yous power on the Oracle Individual Cloud Appliance for the commencement fourth dimension, ensure that you have made the necessary external network connections. These are different depending on the system network architecture. Refer to the section with instructions for your appliance type:
-
Department 3.ane, "Network Connection and IP Address Requirements for Ethernet-based Systems"
-
Section 3.2, "Network Connection and IP Address Requirements for InfiniBand-based Systems"
In addition, you need to connect a workstation with a monitor to the appliance internal management network switch. The switch and port to connect to, are dissimilar depending on the organisation network compages.
-
Ethernet-based appliance: connect the workstation to port 48 in the Cisco Nexus 9348GC-FXP Switch
-
InfiniBand-based apparatus: connect the workstation to port nineteen in 1 of the Oracle Switch ES1-24 switches
Statically configure the workstation IP address to 192.168.4.254. Start a web browser session in social club to initially administrate your Oracle Private Deject Apparatus using the pre-defined IP address ( 192.168.4.216 ). For more information, come across Section 5.iii.v, "Connect the Apparatus to the Network".
five.3 Power On for the First Time
- 5.3.1 Review Safety Guidelines
- five.iii.2 Inspect the Appliance
- 5.iii.3 Connect the Power Cords
- 5.3.iv Ability On the Appliance
- 5.3.5 Connect the Appliance to the Network
This department provides instructions for each phase of the initial power-on sequence.
5.3.1 Review Safety Guidelines
Earlier powering on the system or installing any server equipment into the rack, read the Important Safety Information for Oracle's Hardware Systems (7063567) document included with the system.
Before powering on the system, review the post-obit prophylactic precautions. Failure to observe these precautions can result in personal injury, equipment damage, or malfunction.
-
Do non block ventilation openings.
-
Do non place cables under the equipment or stretch the cables too tightly.
-
Do not disconnect ability cords from the equipment while its power is on.
-
If you cannot reach the connector lock when disconnecting LAN cables, then press the connector lock with a flathead screwdriver to disconnect the cable. You could damage the system board if you force your fingers into the gap rather than using a flathead screwdriver.
-
Do not place anything on top of the organisation or perform whatever work directly to a higher place information technology.
-
Do not let the room temperature rising sharply, especially during winter. Sudden temperature changes can cause condensation to grade inside the system. Allow for a sufficient warm-upwards period prior to organization operation.
-
Avoid static electricity at the installation location. Static electricity transferred to the system can cause malfunctions. Static electricity is oft generated on carpets.
-
Confirm that the supply voltage and frequency match the electric ratings indicated on your Oracle Private Deject Apparatus.
-
Exercise not insert anything into any arrangement opening, unless doing so is function of a documented procedure. The system contains loftier-voltage parts. If a metal object or other electrically-conductive object enters an opening in the system, then it could cause a brusk circuit. This could result in personal injury, burn down, electric shock, and equipment impairment.
five.3.ii Inspect the Appliance
The following procedure describes how to visually inspect your Oracle Private Cloud Apparatus subsequently it is physically installed at your site, and prior to power being applied to the system.
-
Cheque for rack damage.
-
Bank check the rack for loose or missing screws.
-
Check your Oracle Private Cloud Appliance for the ordered configuration. Refer to the Client Data Sheet (CIS) on the side of the packaging.
Annotation
Oracle Private Cloud Appliance is preconfigured by Oracle every bit a cocky-contained system. You should not move whatever equipment or add whatever unsupported hardware to the organisation.
-
Check that all cable connections are secure and firmly in identify every bit follows:
-
Check the power cables. Ensure that the right connectors accept been supplied for the data center facility power source.
-
Check the network data cables.
-
-
Cheque the site location tile system for cablevision admission and airflow.
-
Cheque the information eye airflow that leads in to the front of the system.
For more data, run into Section 2.v, "Ventilation and Cooling Requirements".
5.iii.iii Connect the Power Cords
The following procedure describes how to connect ability cords to your Oracle Private Cloud Appliance.
-
Open up the rear cabinet door.
-
Ensure that the correct power connectors have been supplied.
-
Unfasten the power cord cable ties.
The ties are for shipping but and are no longer needed.
-
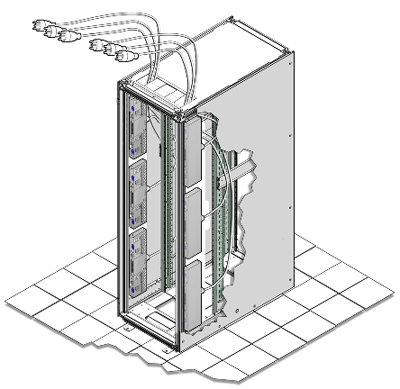
Road the power cords to the facility receptacles either above the rack or beneath the floor. Meet Figure 5.1 and Figure 5.2.
-
Secure the power cords in bundles. Run into Figure v.1.
Figure 5.1 Power String Routing From the Bottom of the Rack
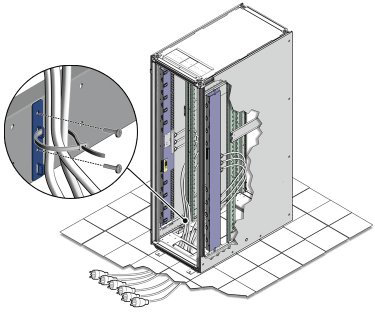
Figure 5.2 Power Cord Routing From the Meridian of the Rack
-
Plug the power distribution unit (PDU) power string connectors into the facility receptacles. Ensure the billow switches are in the OFF position before connecting the power cables.
5.3.4 Power On the Appliance
The post-obit procedure describes how to power on your Oracle Private Cloud Appliance.
-
Ensure that the iii main power cords are connected to a reliable ability source.
For more data, run across Section two.3, "Electrical Power Requirements".
-
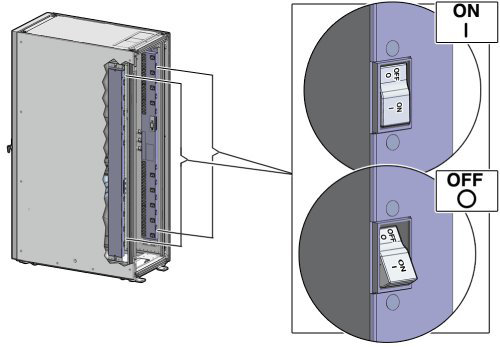
Switch on the power distribution unit of measurement (PDU) circuit breakers located on the rear of PDU A and B within the Oracle Private Deject Appliance.
The circuit breakers are on the rear of the organization cabinet as shown in Figure five.3. Press the ON (|) side of the toggle switch.
Notation
Ensure that the PDU switches have had power applied for approximately two minutes to complete ability-on configuration earlier starting the management nodes.
Figure 5.3 PDU Switch Locations
-
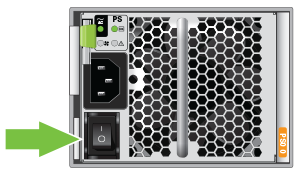
Make sure that the excursion breakers located on the rear left and correct side power supplies of the Oracle ZFS Storage Apparatus ZS7-2 are in the ON (|) position.
Figure 5.4 Oracle ZFS Storage Appliance ZS7-two Circuit Breakers
-
Press the Power push located on the front of the commencement (lesser) management node. Meet Figure 5.5.
The first management node is located in rack unit 5 (U5). The 2nd management node is located in rack unit 6 (U6). It is switched on and configured automatically during the initial power-on sequence.
A management nodes have approximately v to x minutes to power on completely. Once complete, the Power/OK LED illuminates and remains a steady green.
Figure v.5 Oracle Private Cloud Appliance Management Node
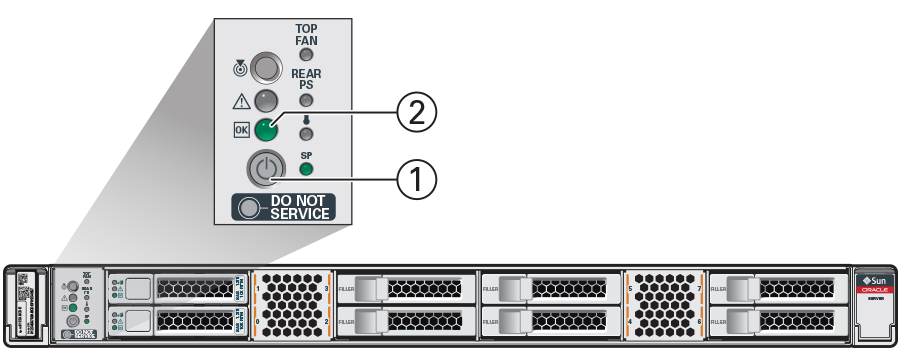
Table 5.2 Figure Legend
Detail
Clarification
i
Power button
2
Ability/OK LED
-
After powering on the first management node, wait while the second management node and all compute nodes are powered on and discovered.
Notation
Afterwards power is applied, the LEDs on all compute nodes and storage server heads volition first to blink subsequently approximately ii minutes. From the rear of the rack, you lot tin can run across the green LEDs on the ability supply units (PSUs) on the compute nodes plough on instantly after ability is practical. In improver, from the rear of the rack, you can see the display on the power distribution units (PDUs) illuminate once power is available.
The management nodes will verify all components within the system. The management nodes ensure that the correct networking switches and storage devices are installed in the organization, and search for compute nodes to add to the compute fabric. Once compute nodes are located, the management software automatically installs the proper drivers and the Oracle VM Server version on each compute node.
Depending on your organisation configuration, the Oracle Individual Cloud Appliance power-on process should take approximately five to ten minutes before the system becomes available for initialization, and upwards to several hours for the entire configuration to be ready. When initialization is completed, utilize the Oracle Private Cloud Appliance Dashboard web interface to configure initial system settings (for case: network properties and passwords). For instructions on connecting to the Oracle Private Cloud Appliance and accessing the Dashboard UI, come across Department 5.3.v, "Connect the Appliance to the Network".
v.3.v Connect the Appliance to the Network
For initial admission to Oracle Private Cloud Apparatus, you must connect a workstation with a monitor to the reserved Ethernet port in the appliance internal management network switch. The Oracle Individual Cloud Appliance Dashboard tin can be reached by ways of a web browser.
Notation
You can connect the workstation to the Ethernet port at any time during the system power-on process. Still, you should wait approximately two to iii minutes after starting the power-on process to allow the IP address to become agile. If you connect too shortly to the port, you will run into an HTTP error lawmaking 404 or like code. If this occurs, wait a few minutes and effort to connect again.
Yous can connect your Oracle Private Deject Appliance to the network as follows:
-
Ensure that the appliance public interfaces are connected to your data centre (public) network.
For details, refer to the section with instructions for your appliance type:
-
Section 3.1.1, "Network Connection Requirements for Ethernet-based Systems"
-
Section 3.2.1, "Network Connectedness Requirements for InfiniBand-based Systems"
-
-
Connect a workstation with a spider web browser directly to the direction network using an Ethernet cablevision connected to the appropriate port:
-
Ethernet-based appliance: port 48 in the Cisco Nexus 9348GC-FXP Switch
-
InfiniBand-based appliance: port 19 in one of the Oracle Switch ES1-24 switches
-
-
Configure the wired network connection of the workstation to employ the static IP address 192.168.4.254 .
-
Using the web browser on the workstation, connect to the Oracle Private Cloud Appliance Dashboard on the active management node at
http://192.168.4.216.192.168.four.216is the predefined virtual IP address of the management node cluster for configuring Oracle Individual Deject Apparatus. If there is another device on your network that is using this IP address, you lot should change the alien device's IP address prior to connecting to the Oracle Individual Deject Apparatus. -
Log into the Dashboard using the user name admin and default countersign Welcome1 .
Note
For security reasons, you must set a new password at your earliest convenience.
When you have logged in to the Dashboard successfully, the dwelling house page is displayed. The central role of the folio contains Quick Launch buttons that provide direct access to the key functional areas. Click to open the Hardware View.
The Hardware View indicates the condition of the appliance as it is existence powered on. All the networking and storage should be green. Every bit the compute nodes are discovered, they will change from yellow to greenish. Wait until all compute nodes take been discovered and provisioned before making configuration changes in the Dashboard interface.
-
Using the Dashboard, configure the system environment parameters, including: domain name, NTP and DNS servers.
Warning
Before reconfiguring the organisation network settings, make sure that no provisioning or upgrade processes are running. For details, refer to the section "Exercise Not Reconfigure Network During Compute Node Provisioning or Upgrade" inside Known Limitations and Workarounds in the Oracle Individual Deject Apparatus Release Notes.
-
Go to the Network Environment window and enter the configuration details. Insert the reserved direction node IP addresses and environment parameters of your information centre network.
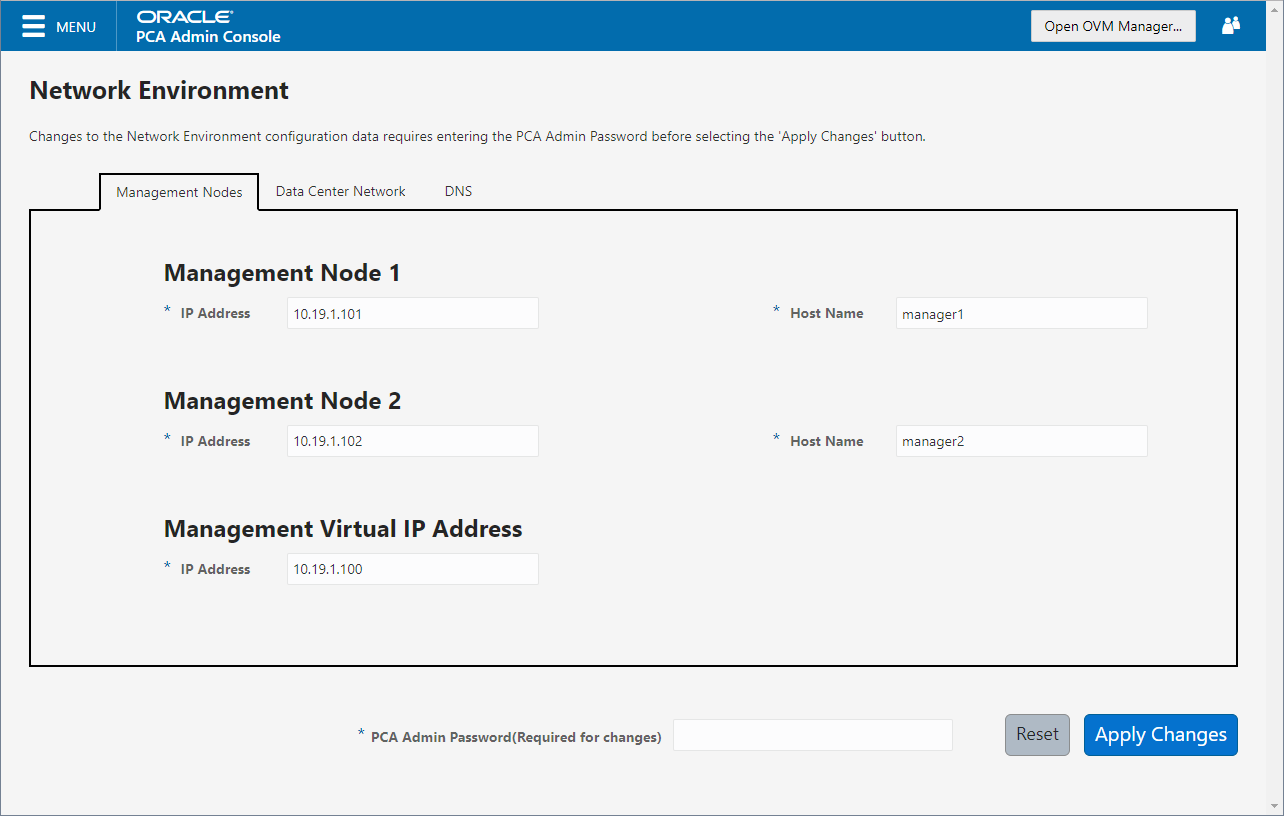
-
In the Management Nodes tab, enter the IP addresses and host names for both direction nodes.
Note
During the initial configuration of the Oracle Private Cloud Appliance, yous modify the predefined configuration IP address to the reserved virtual IP address in your information heart network. For details, see Section 3.3, "General Network Configuration".
Figure v.six Management Nodes Tab
-
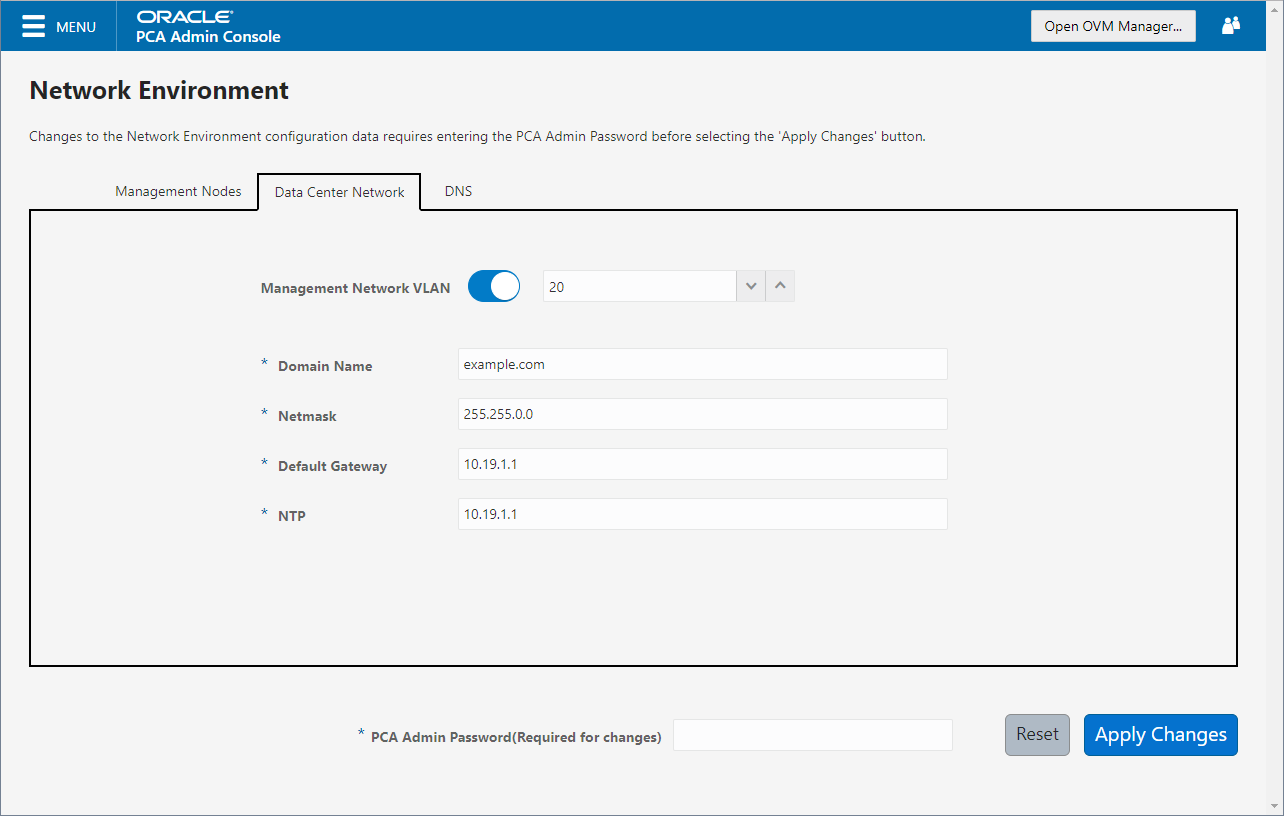
In the Data Middle Network tab, enter the domain name, netmask, default gateway and NTP server of the network to which the apparatus must be continued. If this network is a VLAN, ready the slider to active and enter the VLAN ID in the field next to information technology.
Figure 5.7 Data Center Network Tab
-
In the DNS tab, enter at least one and up to three name servers for the network to which the appliance must exist continued.
Effigy 5.eight DNS Tab

-
Enter the Administrator password and click Utilise Changes to confirm and apply the configuration parameters you provided.
-
-
Reconnect to the Oracle Private Cloud Appliance Dashboard at the new virtual IP accost of the management node cluster: https://
<virtual_ip>:7002/dashboard .
For details about the software configuration process, and for advanced configuration and update options, refer to the Oracle Private Cloud Apparatus Administrator'south Guide.
five.4 What'south Adjacent?
Later on powering on your Oracle Private Cloud Appliance and performing the initial system configuration, the surround is prepare for virtual machine deployment. Refer to the Oracle Private Deject Apparatus Administrator's Guide for data well-nigh working with an operational environment:
-
See Monitoring and Managing Oracle Private Cloud Appliance for instructions to work with the Oracle Private Cloud Appliance Dashboard.
-
See Managing the Oracle VM Virtual Infrastructure for instructions to work with virtual machines within Oracle VM.
-
See Updating Oracle Private Deject Apparatus for instructions to update the Oracle Private Deject Appliance controller software.
-
Run into Servicing Oracle Private Deject Appliance Components for instructions to service client-replaceable components in the Oracle Private Cloud Appliance.

Source: https://docs.oracle.com/en/engineered-systems/private-cloud-appliance/2.4/install-2.4.3/install-poweron.html
Posted by: beaudinspeausell.blogspot.com
0 Response to "How To Install Private Cloud"
Post a Comment